
 info@evershinebuild.com
- Languages: English Telugu Hindi
- Home
- Products
- Tile and Stone Adhesives
- Cementitious and Epoxy Grouts
- Wall Care Solutions
- Tile and Stone Care Solutions
- Waterproofing Solutions
- Structural Grout Solutions
- Protective Coatings
- Tools & Accessories

Tile and Stone Adhesives
Polyglaze PZ 100 & PZ W100

Tile and Stone Adhesives
Polyglaze PZ 200 & PZ W200

Tile and Stone Adhesives
Polyglaze PZ 200 XT & PZ W200 XT

Tile and Stone Adhesives
Polyglaze PZ 300 PLUS & PZ W300 PLUS

Tile and Stone Adhesives
Polyglaze PZ 400 FLEX + & PZ W400 FLEX +

Tile and Stone Adhesives
Polyglaze PZ 500 + PU Adhesive

Tile and Stone Care Solutions
Polyglaze PZ Stone Backcoat

Tile and Stone Care Solutions
Polyglaze PZ Impregnator

Tile and Stone Care Solutions
Polyglaze PZ Stone Sealer

Tile and Stone Care Solutions
Polyglaze PZ Tile and Stone Cleaner

Tile and Stone Care Solutions
Polyglaze PZ Scale Clean

Tile and Stone Care Solutions
Polyglaze PZ EGF Remover

Tile and Stone Care Solutions
Polyglaze PZ CN Epoxy Kit

Tile and Stone Care Solutions
Polyglaze PZ EP Gel Kit
- Projects
- CONTACT US


Why Bathrooms Still Leak After Waterproofing: What Goes Wrong Before the Tiles Go Down
A bathroom can be waterproofed and still develop leakage later. Sometimes the problem is the waterproofing system; sometimes it is a plumbing connection, drainage, or another detail. Either way, the visible damp patch is often not where the problem began.

That is why waterproofing before tiling deserves more attention than it usually gets. Once the tiles are fixed, much of the bathroom waterproofing work is hidden—and much harder to inspect, test, or repair.
The useful question is not simply, "Was the bathroom waterproofed?" It is: "Was the wet-area system prepared, detailed, applied, cured, and checked correctly before it was covered?"
First: Is It Actually a Waterproofing Problem?
Not every bathroom leakage problem starts in the waterproofing layer.
A leaking supply pipe, waste connection, failed seal around a fixture, or drainage problem can also introduce water into places where it should not be.
Before breaking tiles or reapplying a waterproofing coating, the source should therefore be diagnosed.
This distinction matters because a visible damp patch can be misleading. Water can travel through a building assembly before it appears on an adjacent wall or the ceiling below.
What Should a Waterproofing System Actually Do?
Waterproofing is often described simply as a barrier against water. That is true, but on a real construction site, the job is a little more involved.
A waterproofing system sits beneath the finished surface and has to work as part of the wet-area waterproofing build-up. It needs to form a suitably continuous barrier across the areas being protected, while also being properly integrated around corners, junctions, drains and pipe penetrations.
It also needs to be compatible with the substrate and with the layers that follow it. A bathroom waterproofing system should not be considered in isolation from the tile adhesive, tiles and grout that will eventually cover it.
So what should you expect from a properly designed waterproofing system?
A Continuous Protective Layer Within the Specified Area
It should provide the intended barrier against water penetration across the specified areas.
Appropriate Movement Accommodation
Where the selected waterproofing system is designed to accommodate movement or cracking, it should be used within those stated capabilities.
Waterproofing should not be treated as a substitute for addressing structural or substrate problems.
Proper Detailing at Vulnerable Points
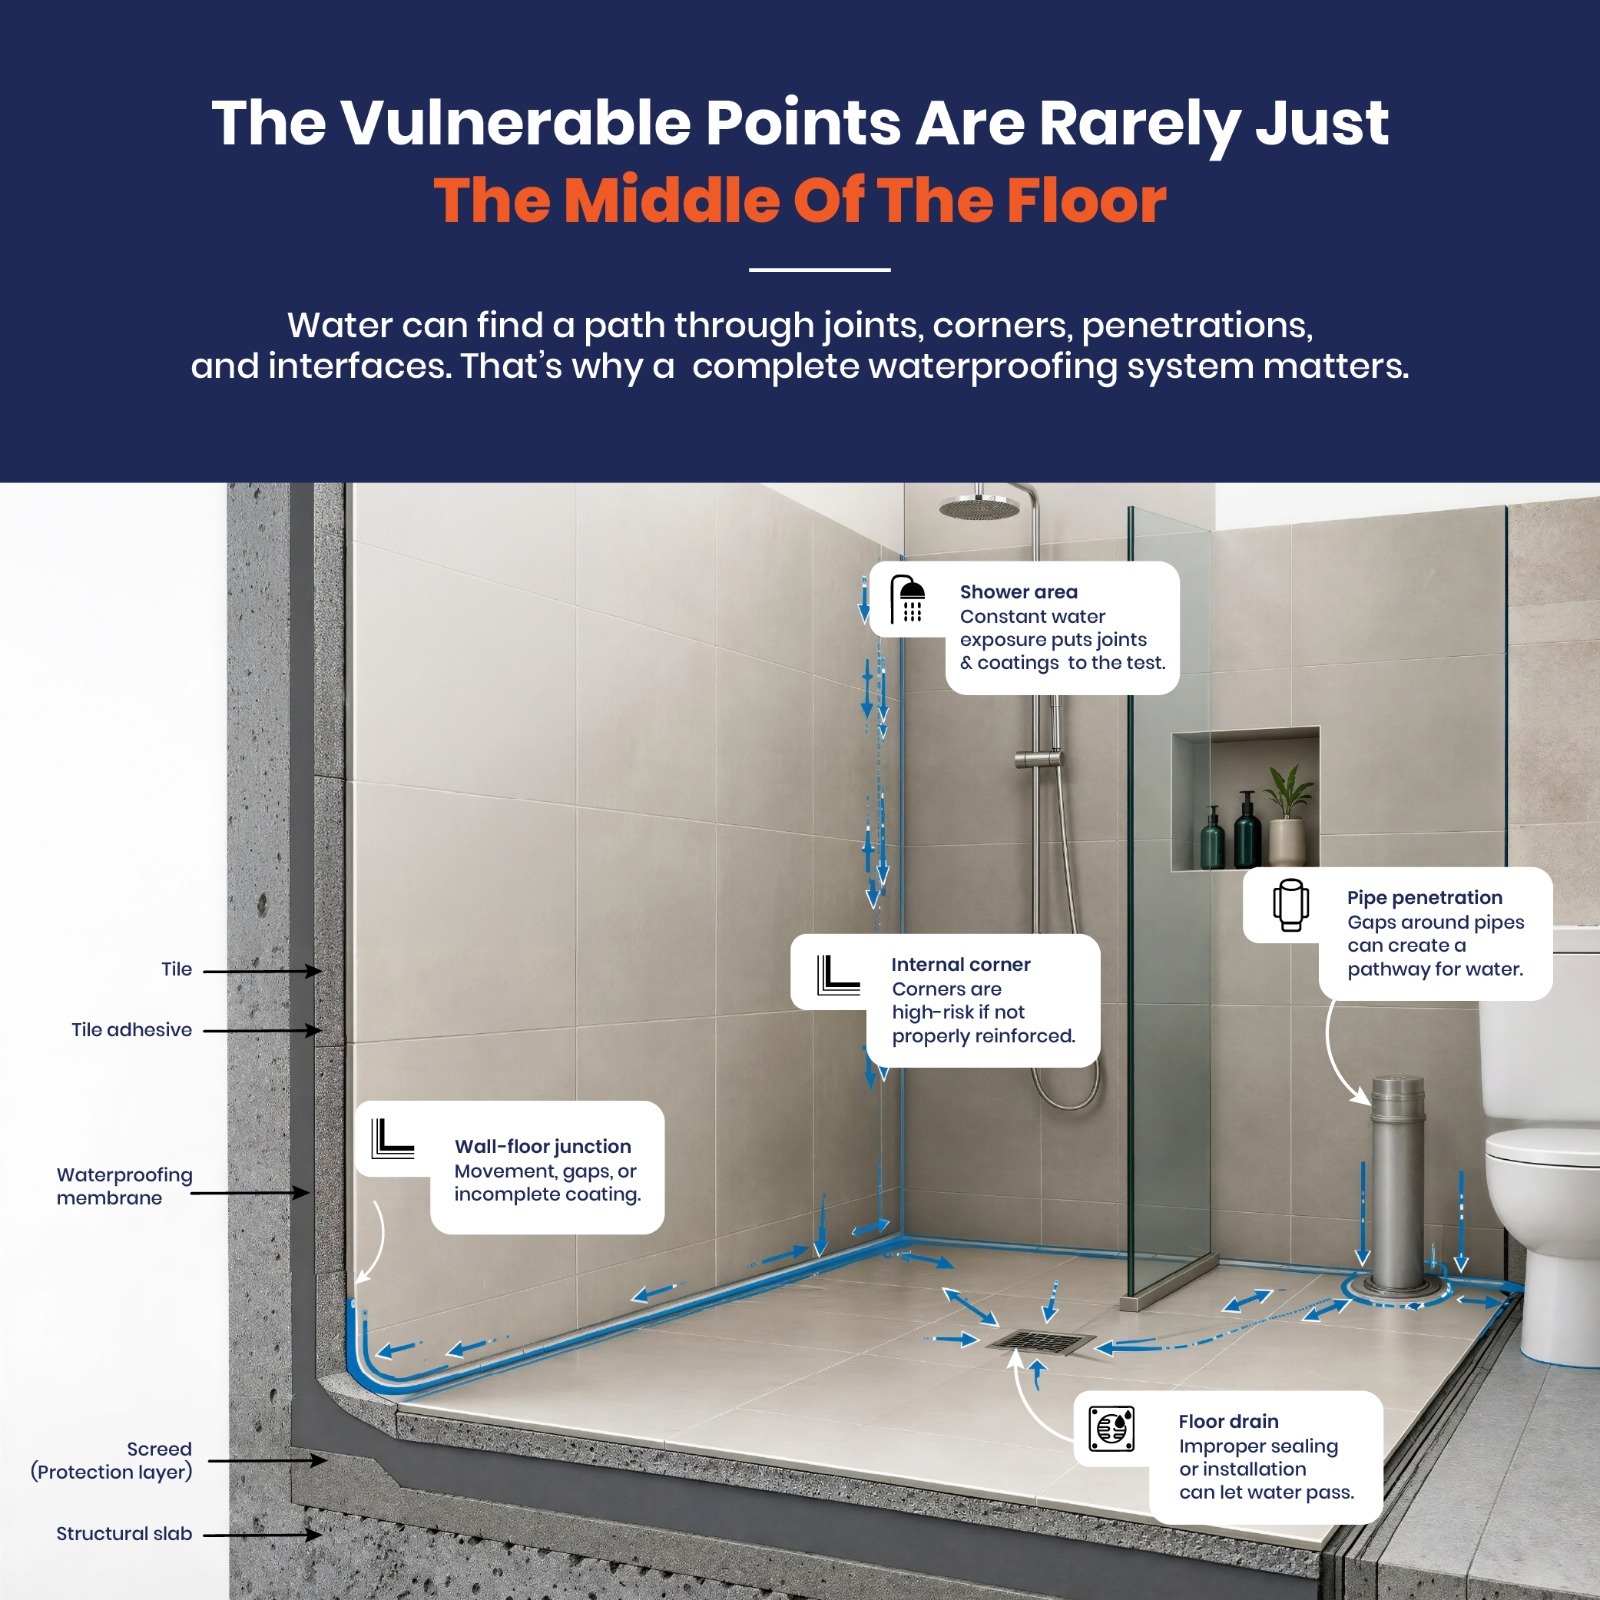
Corners, wall-to-floor junctions, pipe penetrations, drains, and other transitions need to be integrated into the system rather than treated as separate afterthoughts.
Compatibility with the Substrate and Subsequent Installation
The waterproofing system needs to be suitable for the substrate and compatible with the intended tile installation above it.
A Chance to Be Inspected Before It Disappears
Once tiles are installed, most of the waterproofing layer is concealed. Inspection—and where applicable, appropriate water or leakage testing—should therefore happen before the finished surface covers it.
The important point is that waterproofing performance comes from the system and its execution, not simply from the presence of a waterproofing product.
Where Bathroom Waterproofing Can Go Wrong
1. The Substrate Was Not Ready
Bathroom waterproofing starts with the surface beneath it.
Dust, oil, loose material, weak areas, or other surface defects can affect the performance of the selected system. Cracks and damaged areas should be assessed rather than simply covered.
Site takeaway: Before waterproofing, the substrate should be suitably sound, clean, and prepared in accordance with the selected system's requirements.
2. Cracks Were Covered Instead of Treated
Cracks can result from shrinkage, movement, settlement or weaknesses in the screed.
Simply coating over a crack does not automatically address the movement that produced it.
Site takeaway: Treat cracks and damaged areas using an appropriate repair/detailing approach before the waterproofing system is applied.
3. Corners and Junctions Were Overlooked
The large, open area of a bathroom floor is usually straightforward.
The more demanding areas are often where different surfaces meet: wall-to-floor junctions, corners, and other transitions.
These locations need appropriate detailing so the wet-area waterproofing remains continuous.
Site takeaway: Look closely at the edges, not only the middle of the floor.
4. Pipe Penetrations and Drains Become Weak Points
Pipes, floor traps, and drains interrupt the otherwise continuous surface. They can become potential leakage paths when the surrounding
detailing is incomplete, damaged, or incompatible with the selected system.
Site takeaway: Treat penetrations and drainage points as part of the bathroom waterproofing system—not as an afterthought.
5. Drainage Was Treated as Someone Else's Problem
Waterproofing and drainage have different jobs.
The waterproofing layer helps protect the underlying construction from water penetration; the floor slope helps water move towards the drain.
If water repeatedly remains where it should drain away, the wet area is being exposed to moisture for longer than intended.
Site takeaway: Check the floor falls and drainage arrangement before the finished surface is installed.
6. The Waterproofing System Was Not Applied as Specified
More material does not automatically mean better waterproofing.
Waterproofing systems have their own requirements for mixing, coats, coverage, thickness, recoat intervals, curing, and application method.
Site takeaway: The product's Technical Data Sheet (TDS) and specified application procedure should be followed rather than relying on a generic
number of coats.
7. Tiling Started Before the System Was Ready
Waterproofing systems need time to cure, and the required time depends on the product and site conditions.
Starting the next stage too soon can interfere with the intended performance of the system.
Site takeaway: The question should be "Has the system completed its required curing period?" rather than simply "Can we start tiling?"
8. The Waterproofing Was Covered Before It Was Checked
Once the tiles go down, most of the waterproofing becomes inaccessible.
That makes this the critical window for inspection and, where appropriate, water-ponding or leakage testing.
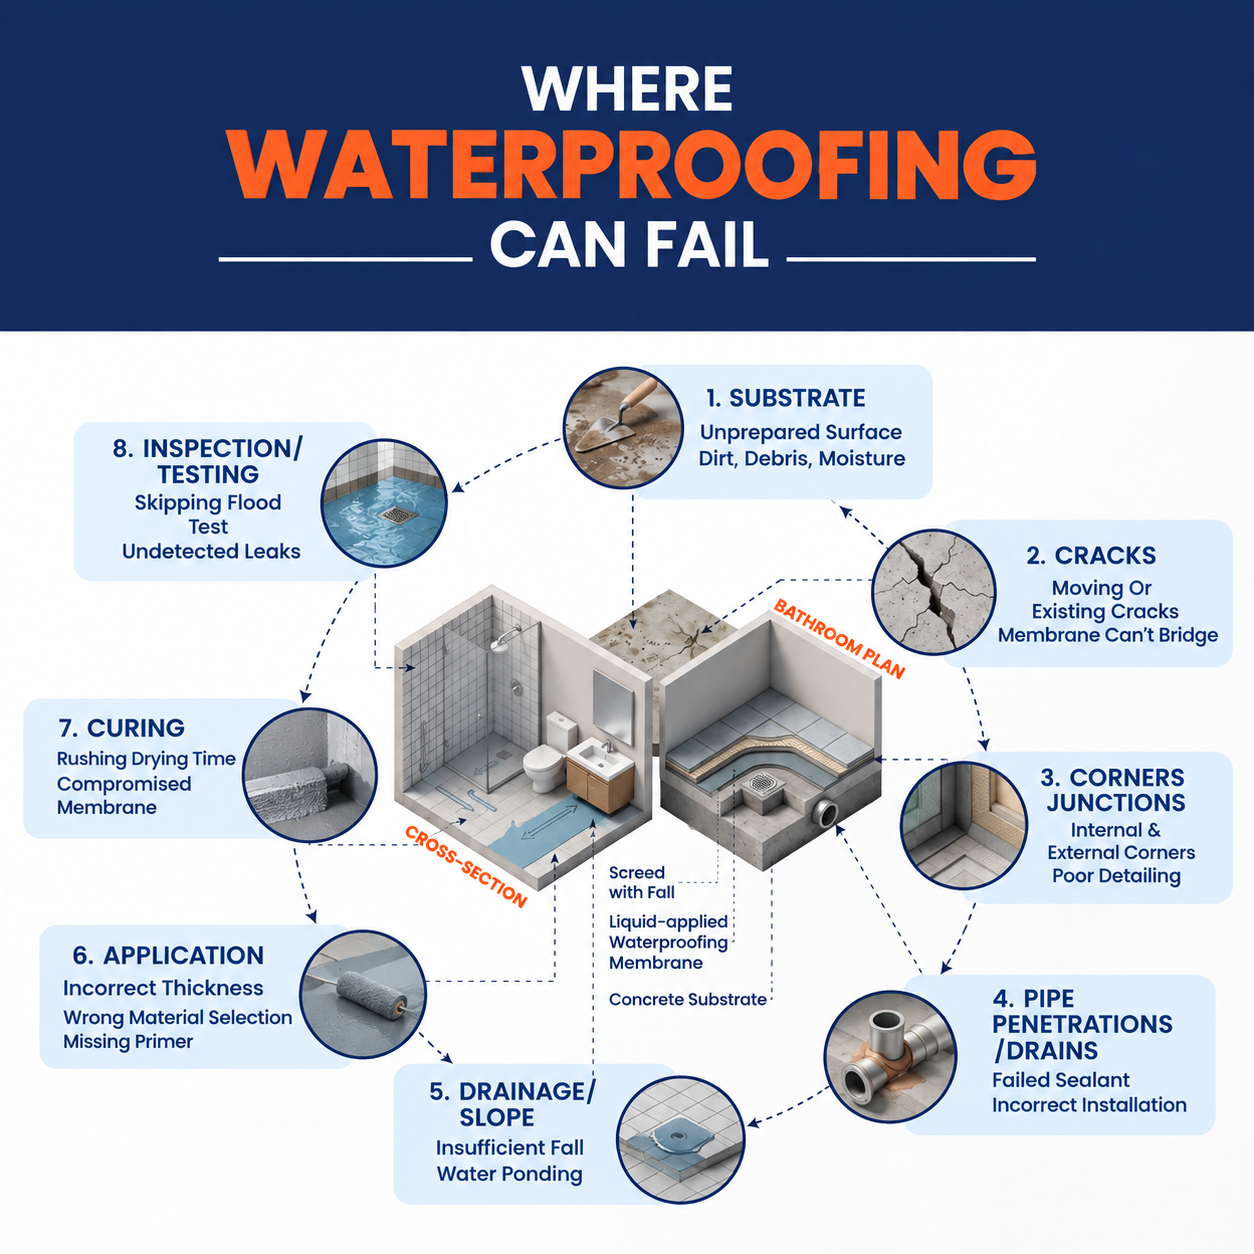
Site takeaway: Find the problem while the waterproofing is still visible and repairable.
What Can a Waterproofing Problem Look Like?
A problem may become visible as:
-
Damp patches on an adjoining wall or the ceiling below
-
Peeling or blistering paint
-
Water staining or persistent dampness
-
Musty odour or mould associated with moisture
-
Dampness around fixtures or penetrations
-
Recurring bathroom leakage after showering or washing
These signs do not, by themselves, prove that the waterproofing membrane has failed.
Plumbing, drainage and other building details should also be investigated. The aim is to identify the source before choosing a repair.
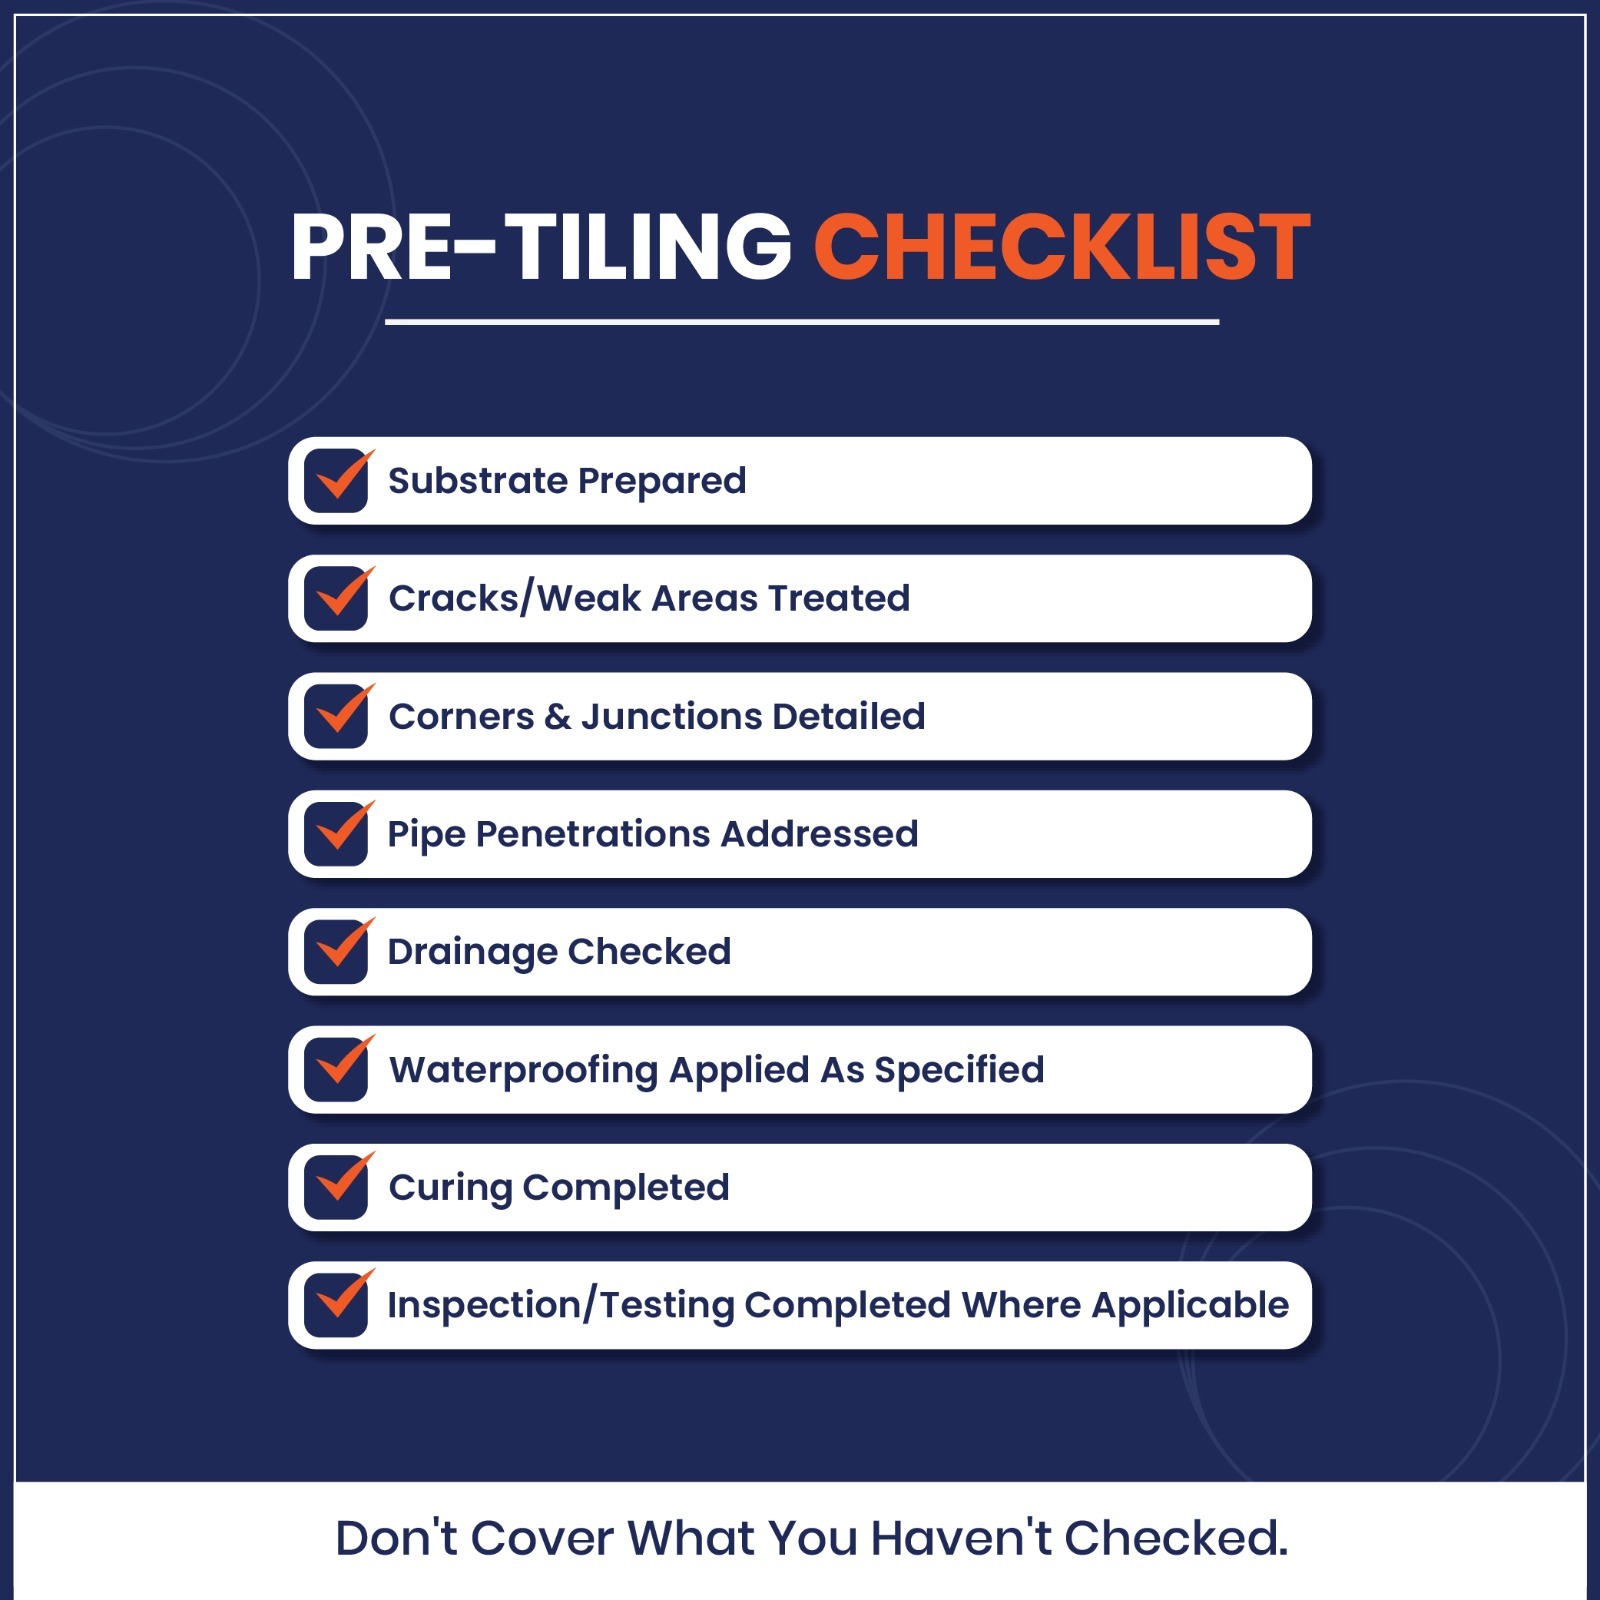
Waterproofing Before Tiling: A Simple Pre-Tiling Check
Before the first tile is fixed, the following questions can help the site team confirm that the bathroom waterproofing stage is ready to be covered:
Why Tiles and Grout Shouldn’t Be Relied Upon as the Waterproofing Layer
Tiles provide the finished surface of a bathroom, but they should not be treated as the primary waterproofing layer.
Water can reach vulnerable areas through grout joints, cracks, gaps, fixture connections, and other openings.
A typical wet-area waterproofing system may include several layers, each with a different role:
Substrate → Waterproofing → Tile Adhesive → Tiles → Grout
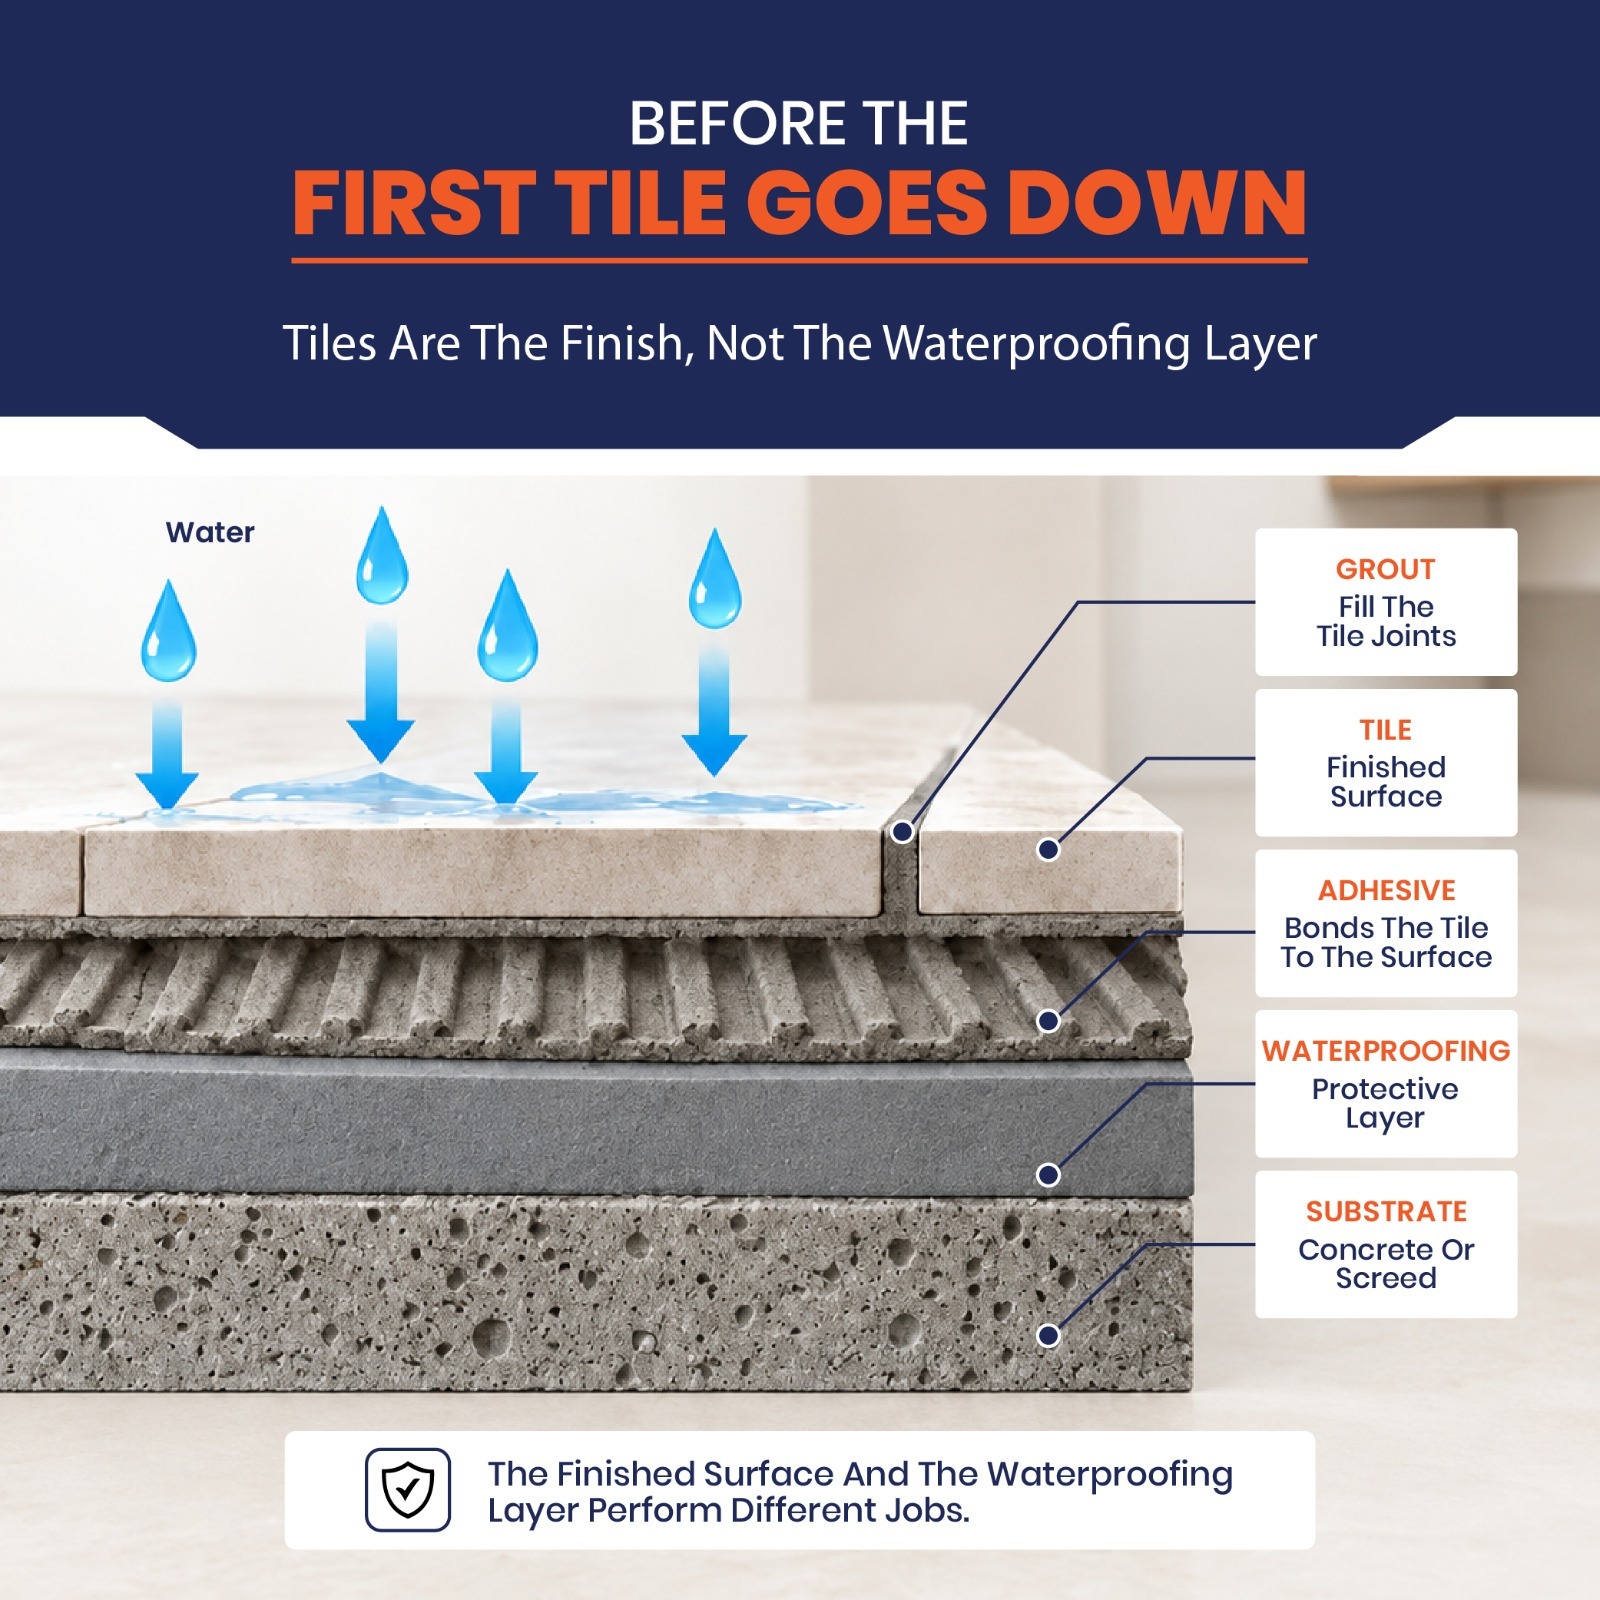
The exact build-up varies with the construction, substrate, and selected system. The important point is that each layer has a defined role; one layer should not be expected to compensate for a failure in another.
Does Waterproofing Change When You Are Renovating a Bathroom?
Yes—but the starting point is different.
In a new bathroom, the sequence is easier to plan because the substrate, plumbing, drainage and waterproofing can be considered before the finished surfaces are installed.
A bathroom renovation is different. You may already have old tiles, an existing screed, concealed plumbing and a leakage problem whose source is not immediately obvious.
That means the first step should not automatically be:
"Apply a new waterproofing layer."
It should be:
"Understand what is already there and identify where the problem is coming from."
For a renovation, it is worth considering:
-
Is the leakage actually coming through the wet area, or could it be a plumbing issue?
-
What condition is the existing substrate in?
-
Are there loose, cracked, or damaged areas beneath the existing finish?
-
Can the existing surface be suitably prepared for the proposed waterproofing system?
-
Do the drainage and floor levels still work correctly?
-
Are existing pipe penetrations and fixtures contributing to the problem?
-
Is the chosen waterproofing and tiling system appropriate for the existing conditions?
In some renovation situations, removing finishes may be necessary to properly diagnose or rectify the problem.
In others, a suitable waterproofing solution for bathroom renovation may be possible over an existing substrate if the substrate and
product requirements allow it.
There is no one renovation solution that fits every bathroom.
The existing construction needs to be understood before the new bathroom waterproofing system is selected.
Waterproofing Is a System, Not Just a Coating
A good wet-area installation is a sequence of decisions that have to work together.
The waterproofing material matters, but so do the surface beneath it, the details around corners and penetrations, the drainage, the application method, curing, and the checks carried out before the system is covered.
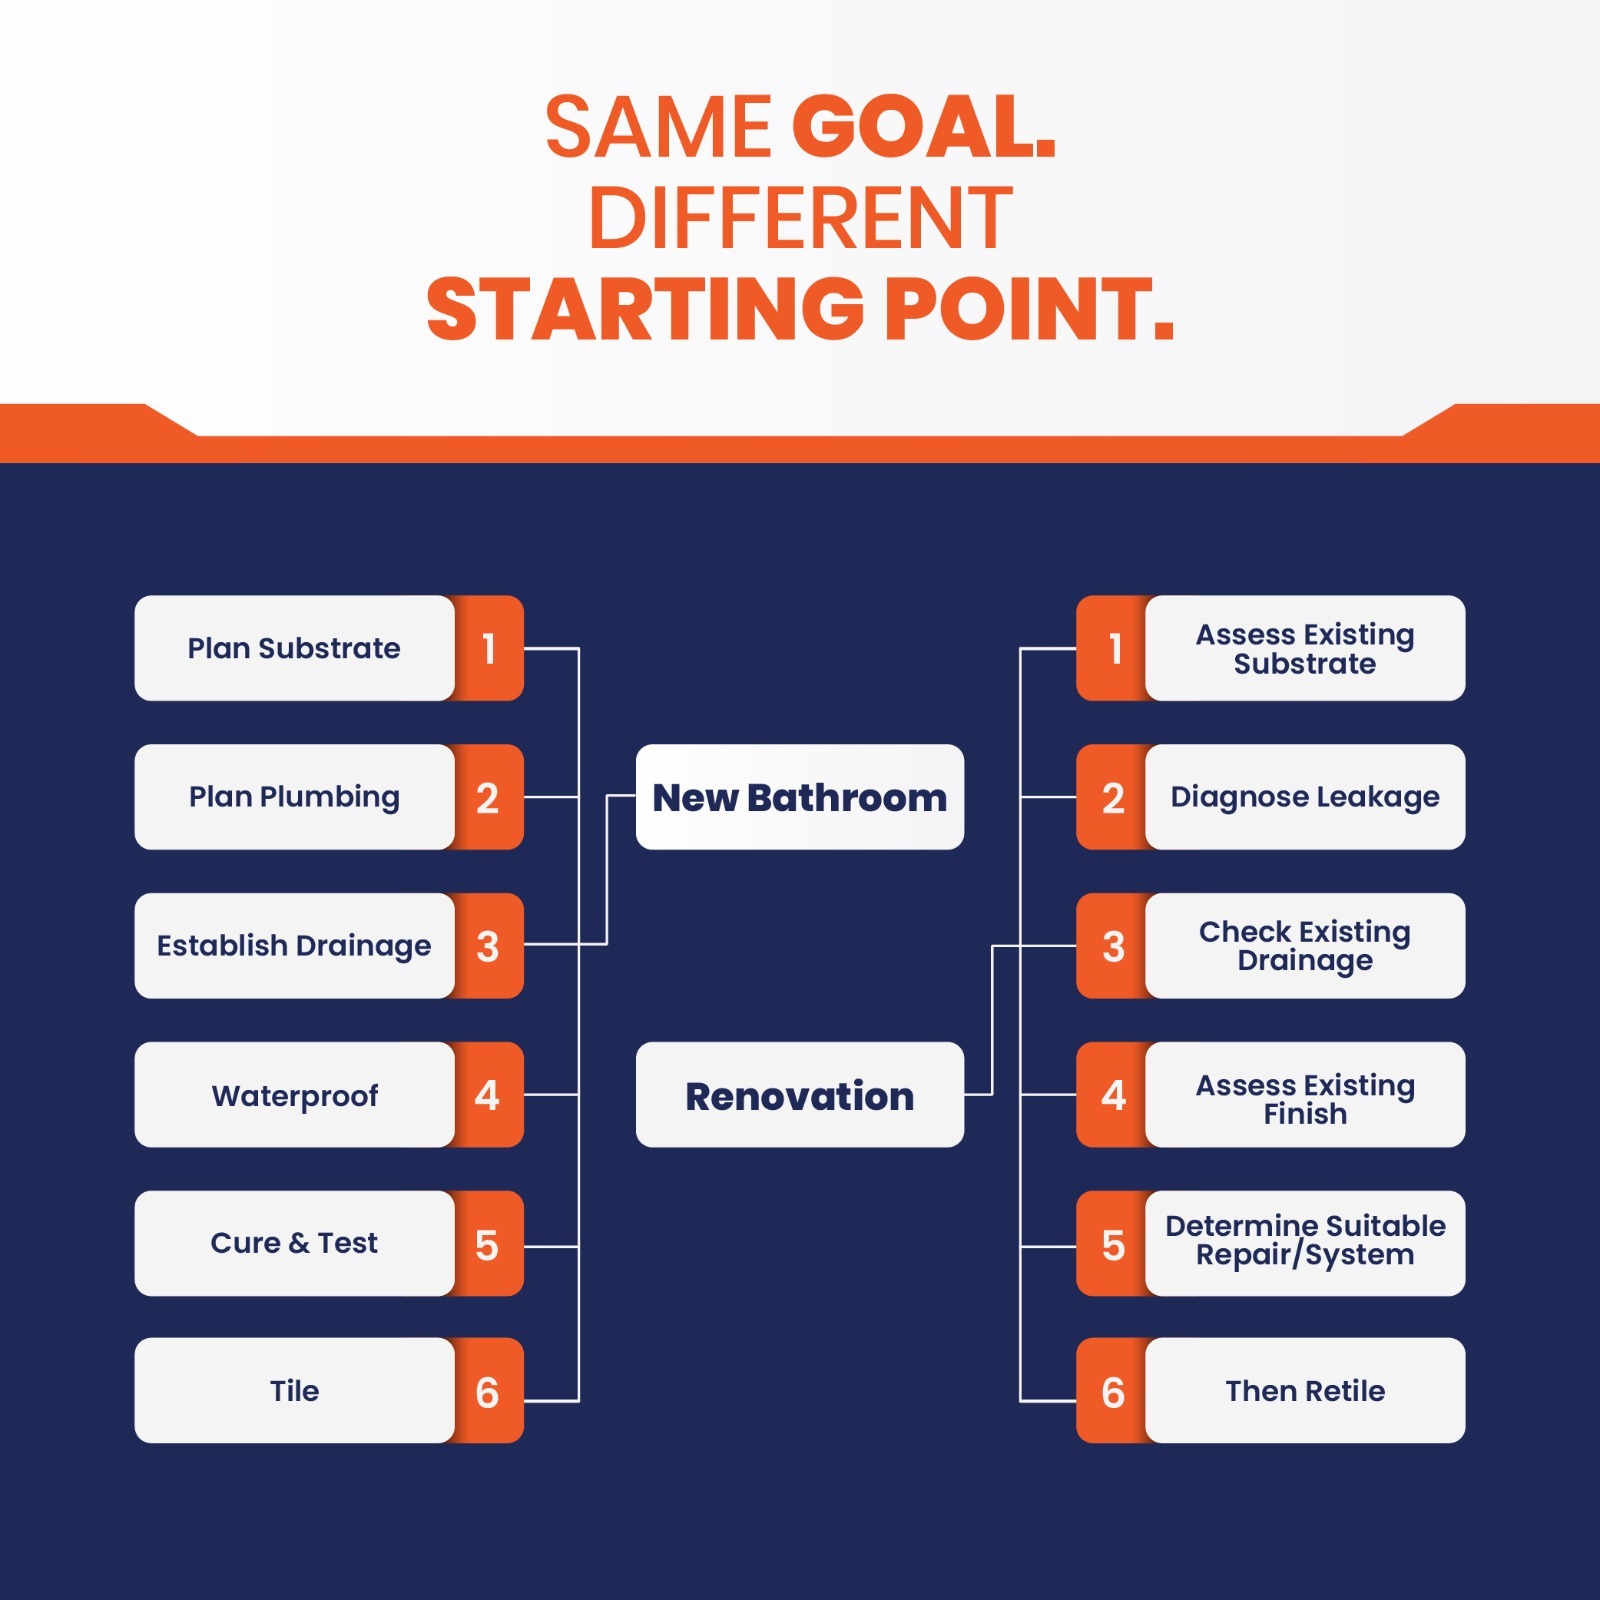
Prepare well → Detail the vulnerable points → Apply the selected system correctly → Allow it to cure → Inspect and test where applicable → Then tile.
Once the tiles are down, the work underneath may be out of sight—but it is still doing the job.
That is why waterproofing before tiling deserves the same attention as the visible finish.
How Polyglaze Approaches Waterproofing
At Polyglaze, we approach waterproofing as a system rather than as a standalone material.
Proper preparation, detailing, application, curing, and integration with the finished tiling system all play a role in protecting a wet area over time.